1
140
Oops I did it again (sh.itjust.works)
submitted 4 days ago by [email protected] to c/[email protected]

The last one went commando, this one's got drawers on.

2
20
Let's make a phonecase! (vid.northbound.online)
submitted 3 days ago by [email protected] to c/[email protected]

cross-posted from: https://lemmy.world/post/33399225

This time I'm trying something a little different. I'm making a phone case, and by me I actually mean me with the help of my brother. My Brother recently got him self a CNC machine, that means I got a CNC machine. Just so happens I also recently got a new phone. A fairphone 5, and since I lack self control, and that little voice that goes "you cant do that". I decided to try and make my own phonecase out of wood.

Feedback is much appreciated.

3
314
made my first cutting board (media.piefed.social)
submitted 6 days ago by [email protected] to c/[email protected]
4
51
submitted 6 days ago by [email protected] to c/[email protected]

A few years back I bought a big jug of Titebond2 glue, figuring it'd last me a decade fulfilling my occasional need to make some wood stick together better than nails or pocket holes. I store it on my back porch, which is indoors but only gets climate control from the blower return in the room, so the room hovers between about 50F (10C) and 90F (32C) depending on the season.

I keep it capped when not pouring it into a smaller bottle that's easier to manage.

I didn't use it last year.

This morning I had a need, so I opened the cabinet and the attached picture is what I see. The glue has gone from an off-white to this translucent reddish-brown, and it won't flow out of the bottle.

I was able to squish a decent amount onto a piece of scrap wood, and smear glue into the joints, then wipe off the excess - but it looks like I need to go buy more glue. I'm not happy about it, but I'll own that I messed up and should have bought a smaller bottle, it's on me.

Can anyone tell me what might have happened? I tried to be careful with it, but clearly something happened that I didn't plan for. What can I do to prevent this from happening in the future?

Thanks!

5
68
submitted 3 weeks ago* (last edited 3 weeks ago) by [email protected] to c/[email protected]

The Post

Very slight woodworking to fit the frame to the tabletop involved ;)

I love this standing desk, can highly recommend!

(Cannot remove the URL lol)

6
31
submitted 4 weeks ago by [email protected] to c/[email protected]

I have a larger than average nose. Specifically, I think the bridge of my nose is too wide. This means that most safety glasses sit up too high on my face, and leave a gap below my eyes that is unprotected. Do you have any recommendations for safety glasses that might fit me better?

7
17
submitted 4 weeks ago by [email protected] to c/[email protected]

It's the return of "what's in that pile" -- the series that SO MANY PEOPLE (maybe 10 or 20) have been asking me to bring back! This time I dig into the pile, pull out one of my favorite kinds of wood (a trash piece of aspen), and decide to make a platter to help me make friends with a Scrub Jay.

Will it work? Will I need to go back to the drawing board? Do you want to see me continue on this quixotic quest to make one of these grumpy birds my best friend?

8
261
submitted 1 month ago by [email protected] to c/[email protected]

The box is made from reclaimed wood, and she is super happy with it.

9
34
submitted 1 month ago by [email protected] to c/[email protected]
10
118
submitted 1 month ago by [email protected] to c/[email protected]

Does anyone else whittle? Johnny Layton is an amazing teacher. His video on sharpening led me to cutting paper with my knife for the first time in my life. Finally having a sharp knife has made whittling more fun

11
41
submitted 1 month ago by [email protected] to c/[email protected]

The only thing i can come up with is to start with a long mitre on the edges, use a jig to cut a 45 degree dado on each corner, then inlay the edges/feet?

My concerns are:

  1. I can't use splines on the mitres, they'll be visible.
  2. I'll be cutting most of the mitre joint away, leaving very little glue surface.
  3. I'd have to glue in the feet/edges cross-grain, so the glue will probably fail with wood movement.

The upside is that this is an urn (i guess that's not an upside for everyone involved) so I'll be gluing the lid on, which should provide some extra stability.

12
174
submitted 1 month ago* (last edited 1 month ago) by [email protected] to c/[email protected]

cross-posted from: https://lemmy.world/post/31175359

More pics: https://pixelfed.social/p/wjrii/838255973232132267

I messed up in a million ways, but I managed not to screw it up too badly to be happy with it. It used 35-year-old switches and keycaps. Case is dowel joints, an up-jumped rustic picture frame. This was also my first keyboard build with QMK firmware and then the VIAL config tool. Some lessons:

  • ALPS stabilizers are a pain.
  • Don't let sleepy English majors design PCBs after midnight. Seriously, the thing barely works for this layout, but should be slightly better for Cherry MX switches.
  • One is strangely zen when one accidentally deletes all the PCB design files for such a flawed PCB. Still have the fabrication Gerber, but with half a dozen errors that's very near to useless.
  • Don't be a coward with your woodworking. There is a bigger gap between case and keys than I'd like.
  • On the other hand, don't be stupid. The pecan inlay on the back may be there to cover up where I sliced right into the dowels joining the frame together.
  • Sandpaper and Danish Oil forgive many sins.
13
144
Walnut Sideboard (sh.itjust.works)
submitted 1 month ago by [email protected] to c/[email protected]

I foreshadowed this one pretty good. I'm still working on the countertop but the cabinetry is done.

And here are some of those infernal hinges that are way harder to buy than they should be.

14
146
Cherry Keepsake Box (lemmy.world)
submitted 1 month ago by [email protected] to c/[email protected]

Here's a simple box I just finished. Cherry with dovetailed corners.

It turned out well but I regret using cheap hardware from Amazon,especially the stamped hinges.

Finish sequence:

  1. 180
  2. 220
  3. Coat Minwax "Tung" oil wet sanded with 320
  4. Oil wet sanded with 400
  5. #0000 steel wood and paste wax

15
94
submitted 2 months ago by [email protected] to c/[email protected]

Friends, fellows, lurkers, I have suffered a temporary field promotion. For the duration of this post you may address me as Major Aggravated.

I am building a sideboard/buffet/server/credenza/whatever you want to call a low cabinet for the dining room. Shaker style, mostly out of walnut. It features posts/legs at the corners to which the doors will be directly hinged, and the way I've designed this cabinet, the doors will be 3/4" thick, and sit 1/4" inset from the front of the leg. The leg is 1+3/4" thick, so there's 3/4" of leg inside the cabinet. There are other structural reasons I did it this way.

This complicates the matter of door hinges. I know of no pin-and-barrel hinge that will do the job, there's some weird specialty mortise mount concealed hinges that I'm just not sure if they'll work in this application, pivot hinges are too "too cheap for Ikea" for the project, and then there's European-style concealed cup hinges. I've known of these things for awhile but never really looked into them.

Until a couple weeks ago.

These hinges attach to the door with two screws and a big fuckoff hole. The offset from the edge might change slightly from project to project but the door half is pretty standard across the range.

On the cabinet side, there's like 8 different ways they can attach, depending on the anatomy of the cabinet, whether it has a face frame or not and if there are any offsets to consider.

The hinges actually come in two halves, the door side with the cup and the bracket for the cabinet side, and they clip together in a standard way, so that you can fuck up and mix and match parts in ways that won't work.

There isn't a European hinge made to attach to my cabinet as designed, because it sort of does and doesn't have a face frame simultaneously. The no-frame type wants to screw to a wall farther back than the leg, so that's a no-go, and the face mount type wants to attach to a face frame that is flush with the back of the door. They don't really make this easy to learn. They like to refer to the features of their hinges by marketing names that they never explain anywhere, and they don't really describe what they do. You just have to learn that "BLUMotion" means it has a damper through osmosis.

No website that sells these damn things organizes them well. Go shopping for wood screws, you get 90,000 results and you can then refine it by shank diameter, length, drive type, button or bugle head, self-tapping or no, self-countersinking or no, material/coating/finish etc. until you have 3 results, a 4-piece bag, a 50 count box and a 50 pound bucket.

Not these goddamn euro hinges. Nowhere that sells euro hinges in the Western hemisphere does it that way. It seems like a wholesaler buys parts from Blum, assembles them into kits, and these kits get dropshipped on eBay, Amazon, Rockler, the usual scumbags. So you don't get to query a database to narrow down your selection, you get to try to guess what search term will get you what you need and then look at the pictures, a practice that shall henceforth be known as "euro shopping."

You'll see the same marketing images on different platforms accompanied by different diagrams, dimensional drawings or installation instructions. Put it all together and they still don't tell you everything you need to know. I note that Rockler issues their own manuals for these things, not Blum's. Looking at Blum's publications, I can understand why.

I finally figure up what hinge set I think I need, given the little diagrams they provide. I order a few sets for my current and immediate future projects.

What arrives is not what I ordered.

The door side, the actual hinge, looks right. But it comes with the wrong bracket. I see they sell just the brackets, I can order those and get them faster than processing a return. I order some of those. They fit. I make a model out of scrap to make sure they'll work, and the reveal between the frame and the door is like a quarter inch too big. Because it turns out the curvy bit of the hinge is 9.2 more bodacious than what I need, and you'd only learn that by carefully comparing the hinge in your hand with two diagrams in their catalog.

None of the components are stamped with a model or part number. Hell, the people selling these hinge sets don't say "Contents: 2x 640449 hinges, 2x 630449 brackets" so you can compare to Blum's catalog.

It's the smell of ten million monkeys fucking ten million footballs.

16
69
Walnut dust isn't nice (sh.itjust.works)
submitted 2 months ago by [email protected] to c/[email protected]

It's very irritating. And I'm making a lot of it this week. Shut your tracts folks, this one's a doozy.

17
45
submitted 2 months ago by [email protected] to c/[email protected]

Man makes a giant belt sander from an old treadmill and it actually works quite well.

18
163
submitted 2 months ago by [email protected] to c/[email protected]

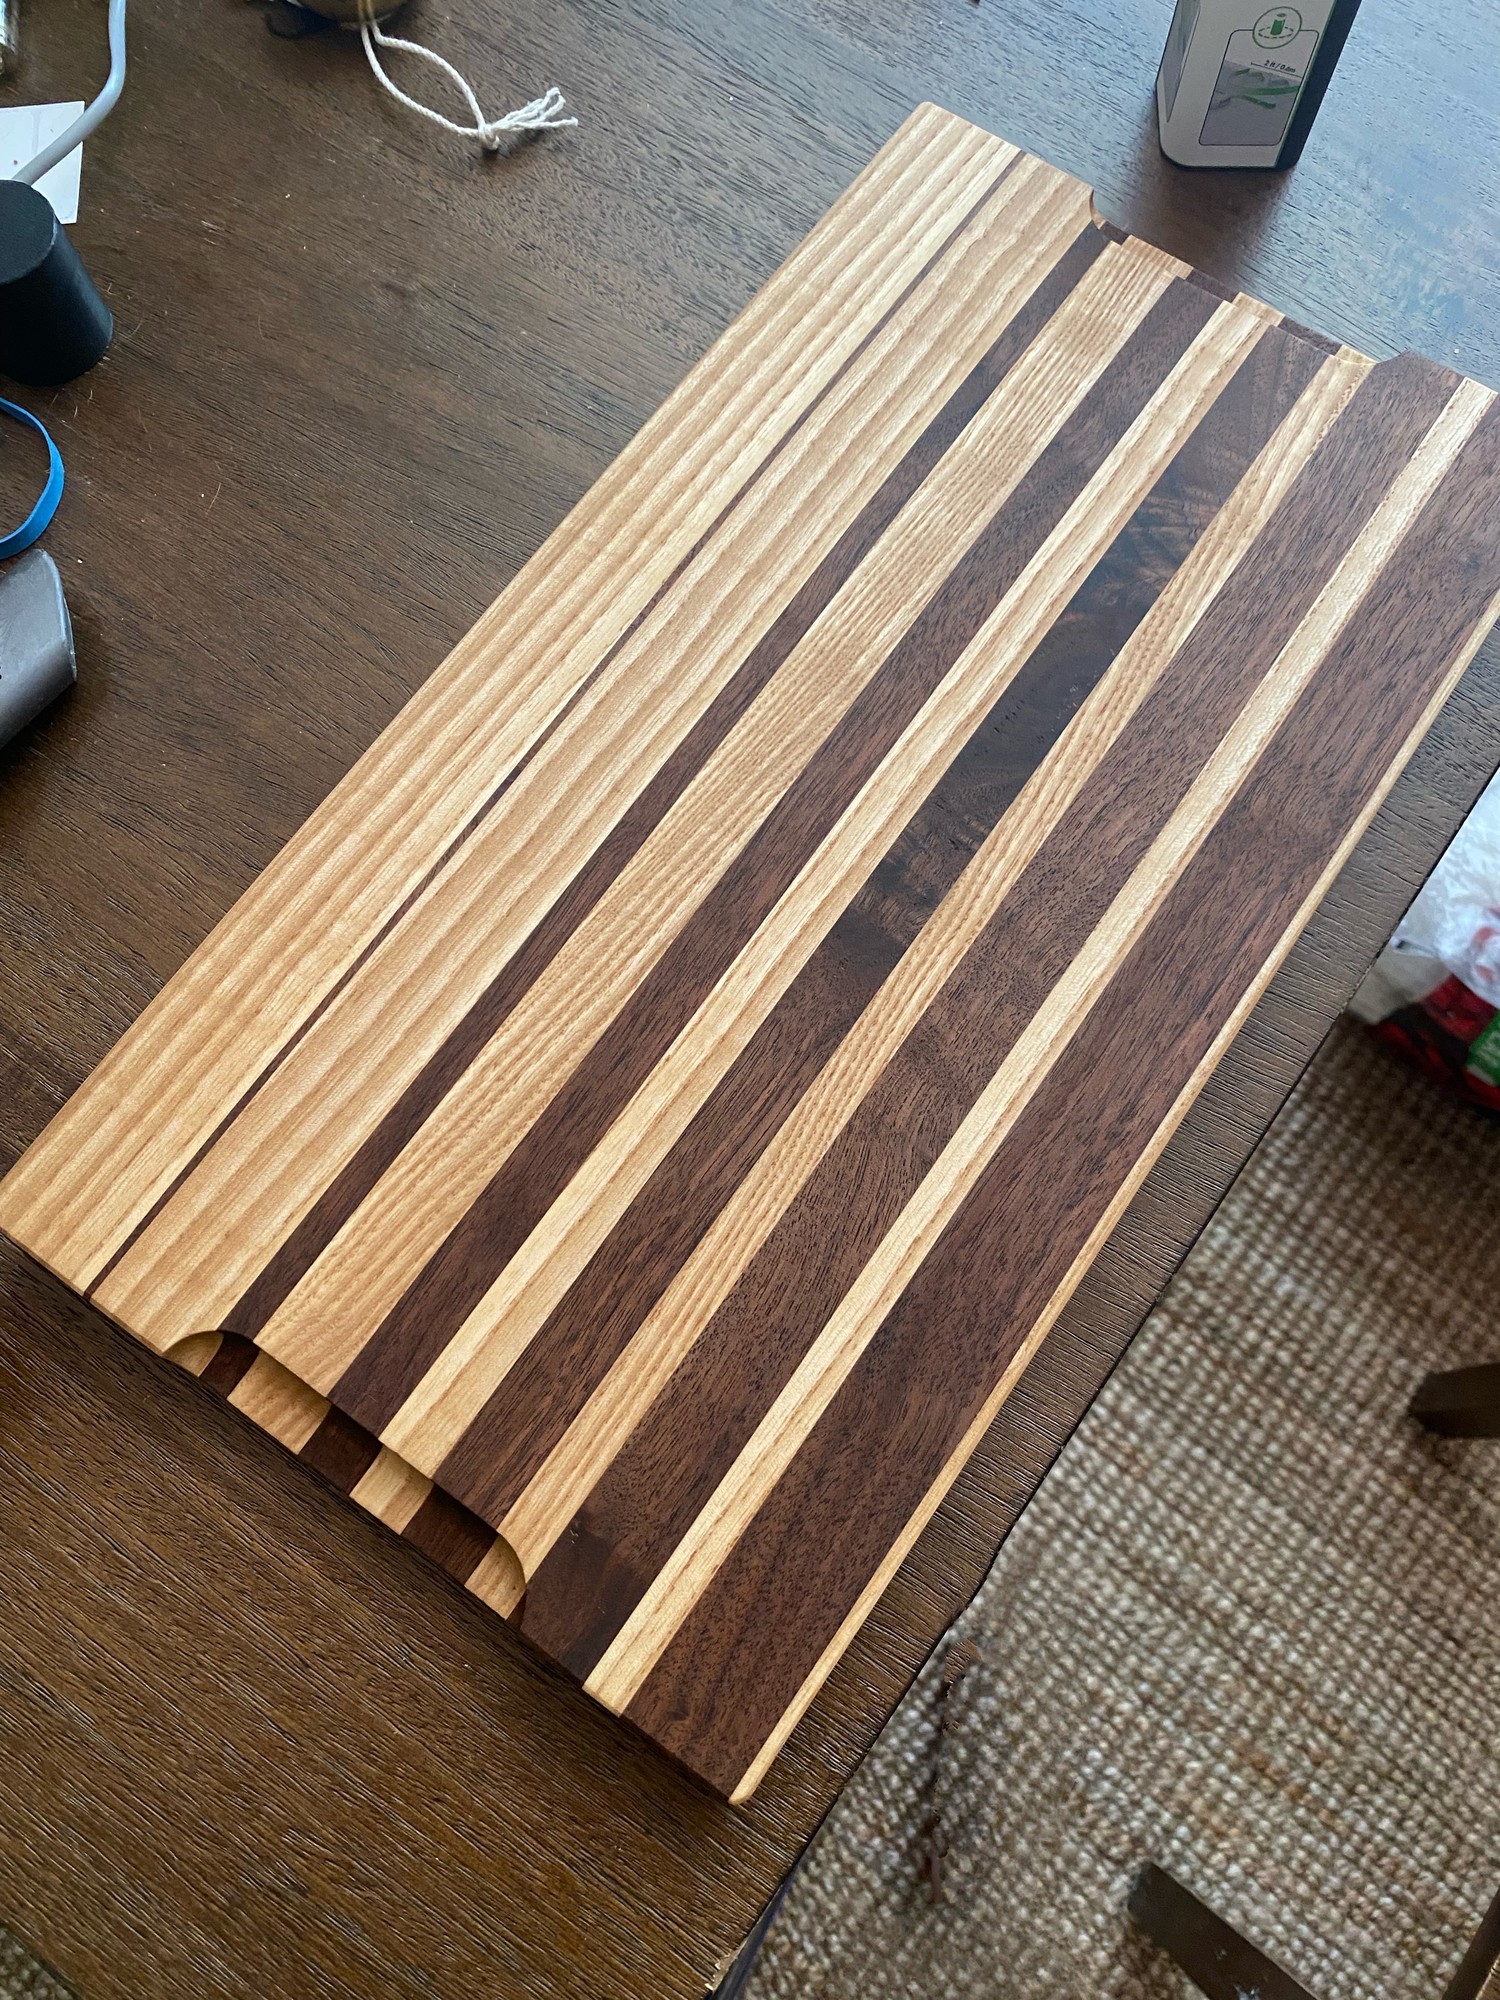
First router project. My family had a trivet like this when I was growing up, and I wanted to recreate it. Made from a scrap end of an oak board.

finished trivet

One of the channels on the bottom has a little deviation but otherwise they came out pretty much straight. And there's a fair amount of burning on the sides. I was moving very slowly at full depth, so I wouldn't have to try to get to the exact same endpoint multiple times at different depths. Curious if that's a likely source of burn and what a better way would be; it's not really a problem on the oak but would be on lighter wood (and I have an ash scrap waiting to be v2).

I started with a practice on a plywood scrap.

blank in jig

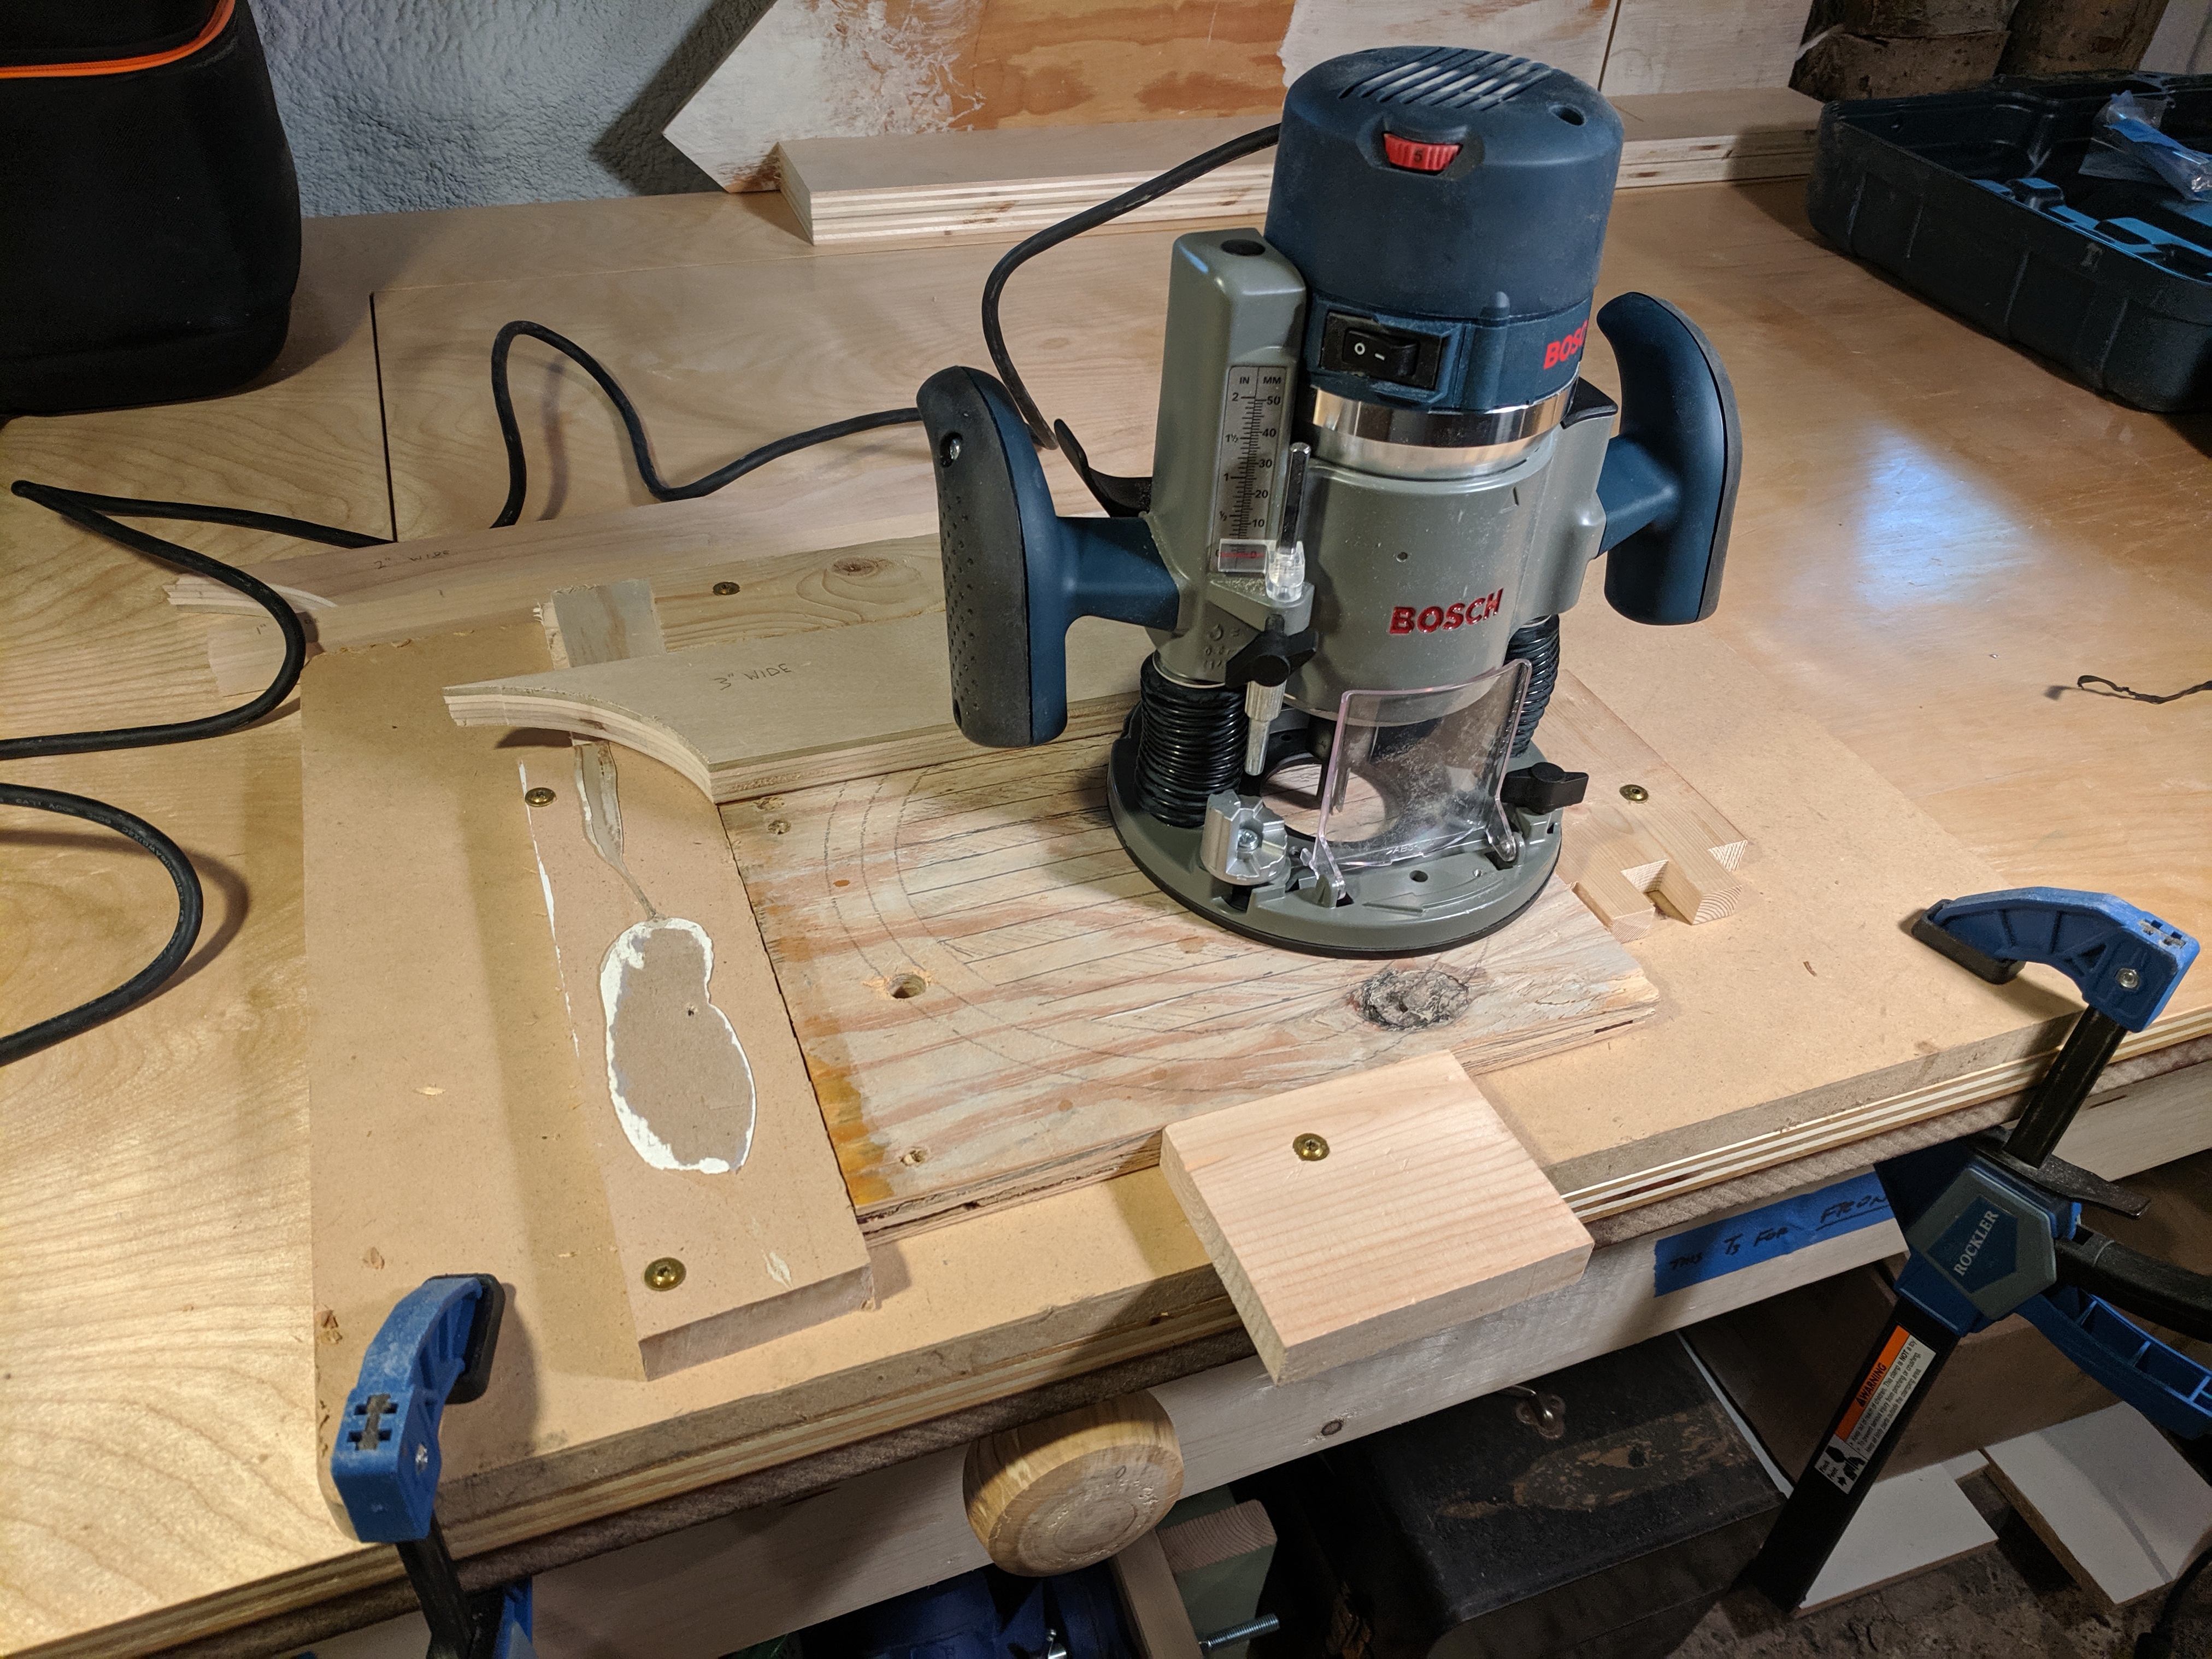
The jig mostly just holds it in place, with a fence along the back and 1", 2" and 3" spacers (then flip it around to work in from the other side).

plywood mockup

For the real thing, I cut it out first on a bandsaw circle jig. That left a pinhole in the center, still slightly visible after a sawdust + glue patch, but it's on the bottom. Placing a channel in the center could avoid that.

circle cutout

After all the criss-cross cuts (routes?) I used a 1/4" roundover. The set of the bandsaw left the outside a little rough, so I'd probably smooth that out before doing the roundover next time.

roundover

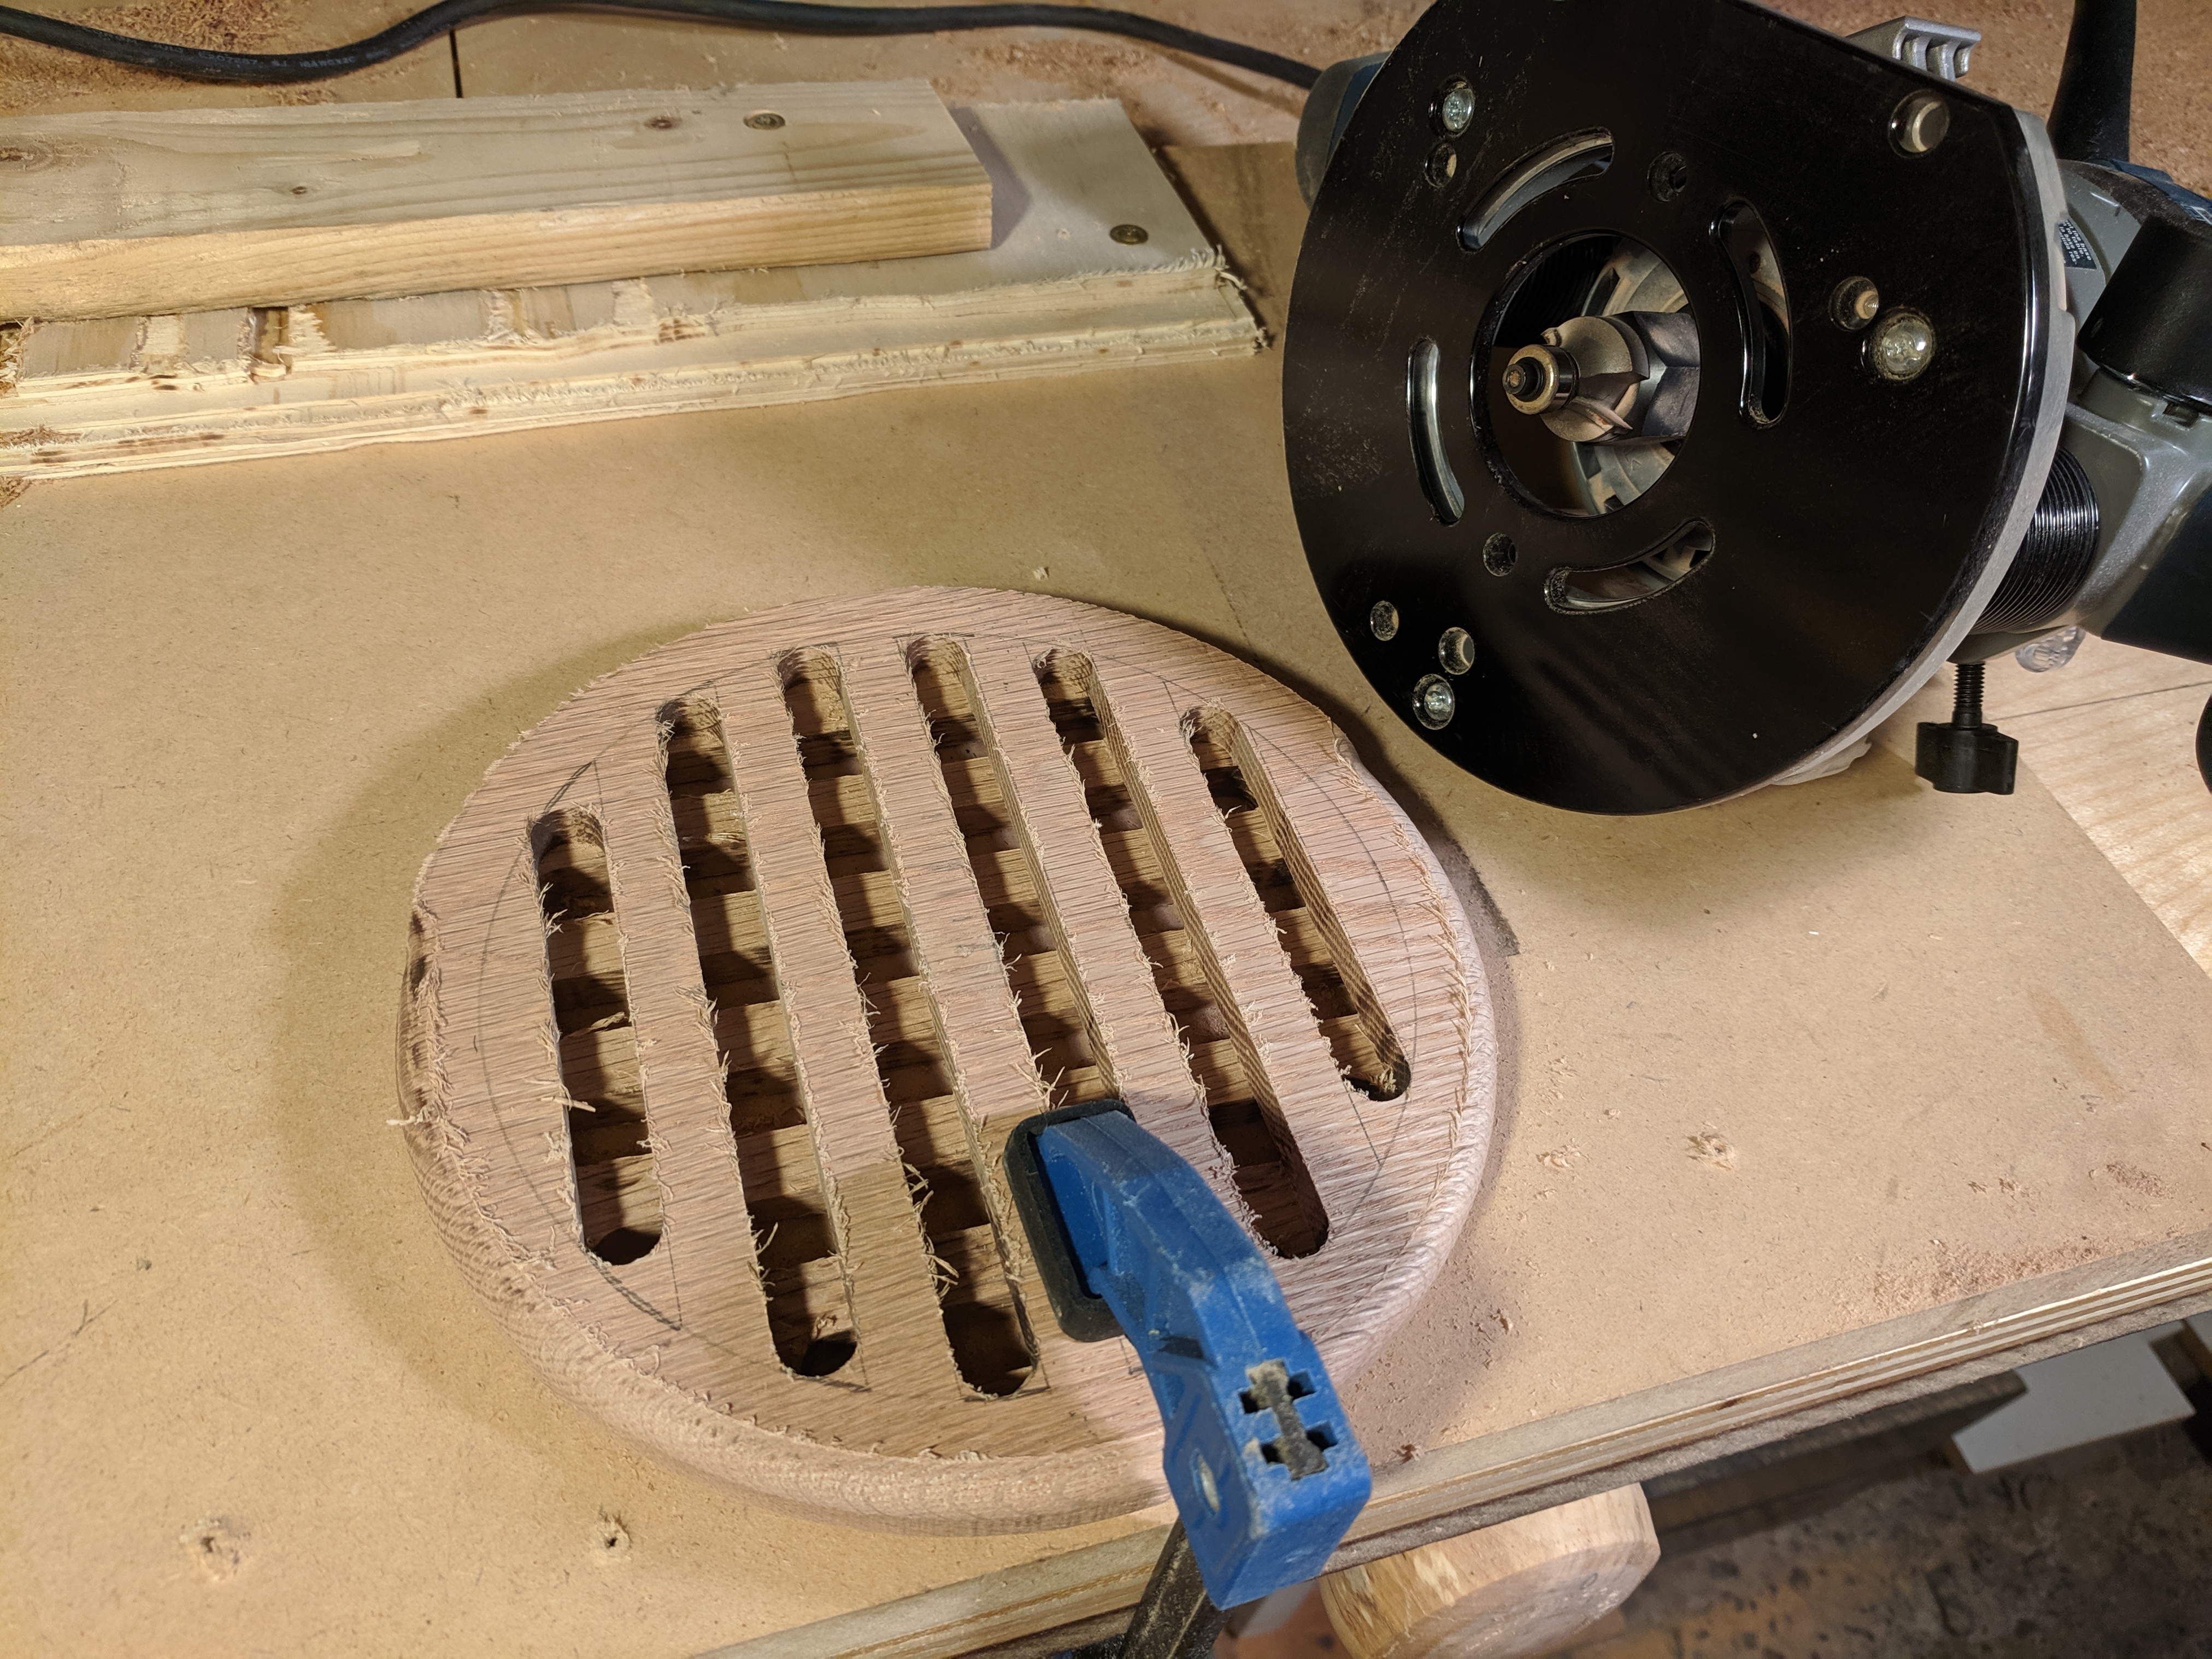
Finally, 80 + 150 + 200 with the orbital sander (just holding the trivet in my hand to do the edge and rounded corner), and butcher block finish.

19
20
submitted 2 months ago by [email protected] to c/[email protected]

I'm planning on getting a hardwood plywood board to attach to an antique(ish) teachers desk so I will have a larger desk. The teachers desk is only ~2.5x4.5' and I'm looking at creating a 3x6' desktop.

My question is, with what should I finish the hardwood plywood? I want to keep/see the wood grain, and would like a finish that will be reasonably durable from day to day wear.

Thanks.

20
308
submitted 2 months ago by [email protected] to c/[email protected]
21
37
submitted 2 months ago by [email protected] to c/[email protected]

I'm hoping someone here can explain something that I haven't been able to find a satisfying answer to - why don't traditional acoustic guitars crack? I mean obviously sometimes they do, but it seems to me like that should happen all the time. For anyone unfamiliar, the front (top) and backs of wood acoustic guitars have their grain direction running parallel to the neck. And inside, there is bracing. That bracing runs perpendicular to the grain of the top, and the bracing is typically glued to the top. Gluing perpendicular grain is generally considered a huge problem when it's an item of furniture and it would be reasonable to expect an object constructed like that to tear itself apart in a few years as humidity fluctuations do their thing. But guitars usually don't do that and I don't understand why.

22
73
submitted 2 months ago by [email protected] to c/[email protected]

Came with an L bracket I was using to put planters on a fence.

23
19
submitted 2 months ago by [email protected] to c/[email protected]

We've got our very first beautiful crying 1.5 month monster in our house now. We went bare bones with the preparations, only getting a crib, changing table and stroller. As the toys, books, play things from family start to come in, I want to start designing and building a storage area.

I'm thinking of an interactive storage area which grows along with my little girl and her play things. Interactive in the sense that the storage skeleton itself perhaps can be moved/ expanded/ collapsible, ala a treehouse or a fort.

I've dedicated an area in my house where the piano and wine rack used to be, it's a 1.2m x 1.2m corner next to a window in the living room.

Other things that came to mind is if one edge of the storage can be a hand painted vertical height marker (instead of being on the wall)

Open to any ideas and suggestions. I'm just trying to avoid the boring plastic storage containers and stacking them up.

24
369
submitted 2 months ago by [email protected] to c/[email protected]

It's a little scratch and dent given it's made out of offcuts, scraps and extras from other projects but I think it came out okay. Three coats of fake "tung oil" finish and it came up to a nice warm semi-gloss, and ambered up the pine enough to take the edge off the grain.

Detail shot of the side hung, center guided drawer and its rabbeted dovetail front and shop made handle.

Yeah I'm going on a bit of a victory lap here, I'm pretty happy with how this one turned out.

25
72
Shop Door Sign (sh.itjust.works)
submitted 2 months ago by [email protected] to c/[email protected]

This sign hangs on my basement shop door. I didn't know Don personally. I think he was the first husband of the lady we bought our house from before he passed away. I've never seriously considered removing it. I don't know why exactly. I guess it feels sort of symbolic.

My shop was once his shop. Even though he's long gone, there's still at least one piece of evidence that he was here. One day it will be someone elses shop. Even though I'll be gone, there will still be evidence of my work. The labor of past generations that went into making a house "home."

Who would have thought woodworking could be so philosophical.

view more: next ›

Woodworking

7654 readers
2 users here now

A handmade home for woodworkers and admirers of woodworkers. Our community icon is submitted by @[email protected] whose father was inspired to start woodworking by Norm and the New Yankee Workshop.

founded 2 years ago
MODERATORS